Showing posts with label traffic. Show all posts

Mar 13, 2013

Lesson 50 - Extended ACL Examples


Try to think of this post as your opportunity to put the extended ACLs into practice. Do not look at the solutions which are presented at the end of this post. Try to accomplish the tasks using IOS help '?' If you have found this difficult, you can look at the solutions and watch my videos I posted on Youtube. ACL related video links can be found at the bottom of this post.

The last video shows the syntax and benefits of using Named ACLs. Once you get to know named ACLs, you will not want to use numbered ones.

Look at this simple topology below first. Then

Pic. 1 - Topology Diagram.

Icons designed by: Andrzej Szoblik - http://www.newo.pl

Extended ACL Lab

Assumptions
You are in charge of R1 and R2 routers. R3 belongs to your Service Provider network (SP) and simulates Internet in our examples. If you want to enable HTTP access on the router, type in the 'config' mode:
ip http server

Static routing has been configured between routers.

Task 1
Configure an access-list disabling anyone TELNET to R1 and all devices behind it (R2) if the traffic is originated from Internet (here: SP). All other traffic should be permitted.

Task 2
On R1 remove the previous ACL and configure a new one allowing only HTTP access to 172.16.102.0/24 if the traffic is originated from Internet (here: SP). All other traffic should be discarded.

Task 3
On R1 remove previously configured access-list. Instead, allow the returning traffic from HTTP (172.16.102.0/24) towards any destination. All other traffic from 172.16.102.0/24 should be discarded.

Task 4
Remove previously configured ACL. Configure an access-list that blocks the TELNET/SSH traffic toR1 if the traffic is originated by 10.1.13.3 address. Use a standard ACL.

Extended ACL Lab


Task 1

Configure an access-list disabling anyone TELNET to R1 and all devices behind it (R2) if the traffic is originated from Internet (here: SP). All other traffic should be permitted.

R1 Configuration:

!
R1(config)#access-list 100 deny tcp  any any eq telnet
R1(config)#access-list 100 permit ip any any
R1(config)#int s0/1
R1(config-if)#ip access-group 100 in
R1(config-if)#end
R1#
!

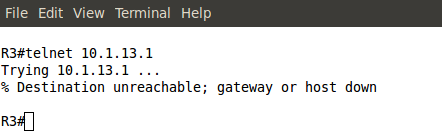
Verification:

Pic. 2 - Ping from R3.

Pic. 3 - Telnet Test from R3.

Pic. 4 - ACL Statistics.

Task 2

On R1 remove the previous ACL and configure a new one allowing only HTTP access to 172.16.102.0/24 if the traffic is originated from Internet (here: SP). All other traffic should be discarded.

R1 Configuration:

!
R1(config)#no access-list 100
R1(config)#int s0/1
R1(config-if)#no ip access-group 100 in
R1(config-if)#exit
R1(config)#
R1(config)#access-list 101 permit tcp any host 172.16.102.2 eq www
R1(config)#int s0/1
R1(config-if)#ip access-group 101 in
R1(config-if)#
!

Notice!
There is an 'implicit' deny all at the end of the ACL that is why I do not have to use: 'deny ip any any' statement.

Verification:

Pic. 5 - ACL Test.

Notice!
I got the connection to port 80 and terminated session using GET command. In order for the router to accept incoming connection to TCP 80 (WWW), you must type in the following command in the 'config' mode:
ip http server


Task 3

On R1 remove previously configured access-list. Instead, allow the returning traffic from HTTP (172.16.102.0/24) towards any destination. All other traffic from 172.16.102.0/24 should be discarded.

R1 Configuration (one way of accomplishing the goal): 

!
R1(config)#int s0/1
R1(config-if)#no ip access-group 101 in
R1(config-if)#exit
R1(config)#no access-list 101
R1(config)#
R1(config)#access-list 102 permit tcp 172.16.102.0 0.0.0.255 eq 80 any
R1(config)#int f1/0
R1(config-if)#ip access-group 102 in
R1(config-if)#
!

Task 4
Remove previously configured ACL. Configure an access-list that blocks the TELNET/SSH traffic toR1 if the traffic is originated by 10.1.13.3 address. Use a standard ACL.
R2 Configuration:

!
R1(config)#int f1/0
R1(config-if)#no ip access-group 102 in
R1(config-if)#exit
R1(config)#no access-list 102
R1(config)#
R1(config)#access-list 1 deny host 10.1.13.3
R1(config)#access-list 1 permit any        
R1(config)#
R1(config)#line vty 0 4
R1(config-line)#access-class 1 in
R1(config-line)#exit
R1(config)#
!

Notice!
Because I forgot to mention this little contraption in my Standard ACL post, here it is. A standard ACL can be used to block traffic to ports VTY (remote access). The ACL is applied using the:access-class statement.

Pic. 6 - Verification.


Notice! 
Changing the source of my TELNET (lo0=172.16.103.3) allows me to login.

In my next post, I'll attempt to explain Network Address Translation (NAT) which you must be familiar at CCNA level (as of the time of posting it).

Lesson 47 - Packet Filtering with Standard ACL


NOTICE!
Access Control Lists can inspect the traffic based on different protocols and criteria. In this post I’m going to focus in on IP-based ACLs. Other types such as MAC-based ACLs, dynamic or reflective ACLs are beyond the scope of this tutorial.

Have you noticed how your hand luggage is being scanned at the airport? ACL is similar to such scanner only used on the router. It can look at the content of the packet traversing it and check the content of the packet up to the layer 4 (extended ACL). You, as an administrator, get to decide what the action is going to be if the packet matches your criteria. A few applications of ACLs are as follows:

  • ACLs can filter the packets that traverse the router in order to drop the unwanted traffic.
  • ACLs can deny SSH or Telnet traffic to vty lines (router/switch remote management).
  • ACLs are used as to match an interesting traffic to trigger VPN tunnel establishment and encrypt data.
  • ACLs are commonly used in Quality of Service to prioritize certain applications or traffic flows over others or provide different treatment to a certain stream of packets.
  • ACLs are used to filter inbound or outbound dynamic protocol advertisements.
  • Etc.
To summarize it: you cannot call yourself a network specialist without being able to use ACLs. In this tutorial, we focus in on IP based ACLs.

IP  Based ACLs
You can use two major IP-based ACLs (look at the guidelines above):

  1. Standard ACLs (numbers: 1 through 99)
  2. Extended ACLs (numbers: 100 through 199)
  3. Named ACL (standard or extended). Named ACLs offer more flexibility in terms of modifying ACLs 'on the fly'
The major differences between them are the amount and type of criteria we can use to inspect the packets as well as the syntax used to create the statement.

In this post I present IP standard ACL only used as a filtering mechanism (permit or deny the traffic through the router), but get familiar with the general guidelines first as they apply to all types and applications of ACLs.

ACL Guidelines
Here are some important guidelines regarding ACLs:

  • ACLs use the top-down processing. This means that statements are being processed from the one listed on the top of the list first. If the statement is a successful match (permit or deny), the remaining entries listed below this matching statement are NOT inspected anymore.
  • Cisco IOS allows to apply only one ACL per interface, protocol and direction. This means that you can apply ACL1 on two different interfaces, or ACL1 and ACL2 on the same interface but in two different directions (in and out).
  • The ACL number will determine whether it is IP standard ACL (numbers 1-99) or IP extended ACL (numbers 100-199).
  • Standard ACL can only inspect the source IP of the packet.
  • Extended ACL will inspect both source and destination IP. In addition to these it can match on layer 4 protocols (TCP, UDP, OSPF, EIGRP etc.) and even the layer 4 port numbers (either source or destination or both).
  • The standard ACLs should be placed close to the destinationextended ACLs should be placed close to the source of the transmission.
  • There is an IMPLICIT DENY ALL at the end of all the statements that you create. This means, that if your statements have been created to deny traffic, there must be at least a single permit statements. Otherwise all traffic crossing the interface where ACL has been configured will be denied (filtered out).
The process of configuring ACLs consist of two steps:
  1. Configuring the ACL statements in the global configuration mode.
  2. Applying the ACLs on the interfaces to inbound or outbound traffic.
Standard Access Lists
Standard ACL offers you only a single criterion to single packets out from the flows a router handles. It is a source IP address. Based on this criterion, a router determines if the packet should be forwarded or dropped. This type of ACL does not check if IP carries TCP, UDP, OSPF, EIGRP etc. Based on the source IP address the “whole” IP packet (irrespective of the layer 4-5 content) will be forwarded or dropped.

This time, I'm going to show you the syntax taken directly from the Cisco web site. The point is, that sooner or later you have to learn how to use the official Cisco Documentation. You must learn how to be self-reliant at your work because in many cases you will not have anyone around to take you by the hand and solve an issue.

The ultimate source of all Cisco related configurations can be found at (here IOS 12.4 version):

http://www.cisco.com/en/US/products/ps6350/tsd_products_support_series_home.html 

Pic. 1 - IP Standard ACL Syntax.
Pic. 1 shows you the standard ACL syntax you type in the 'config' mode (global configuration mode. 
  • access-list - the ACL keyword that is followed by a number of argument
  • access-list-number - IP standard ACLs use the numbers in the range 1-99
  • permit|deny - what is in braces '{}' are possible options; here permit or deny
  • host|source - again in braces '{}' are possible options; here either a host address or other source such as network or subnet.
  • source-wildcard|any - this is the inversed network mask ('1' becomes '0' and vice versa).
Bold font is the keyword that you must use.
Italic font is the arguement that follows the keyword.
| - a pipe is the logical 'or' statement giving you multiple choices.
{} - in braces the possible options are listed.

The next step in configuring an ACL (standard or Extended) is to apply it on the interface in either inbound or outbound direction.

Pic. 2 - Applying ACL on the Interface.
interface - the keyword to enter the interface context (must be in the 'config mode')
<interface> - type/number of the interface (e.g. interface Fa0/0)
ip access-group - the keyword that applies an ACL on the interface
number - the number of access-list configured in the 'config' mode (standard ACL use range 1-99)

in|out - the direction inbound or outbound (how packets are going to be processed)

INBOUND ACLs 
This type of ACL analyzes the packets coming towards the router (the interface where packet was received on). Based on the criteria defined in the ACL, the packet will further be processed (layer 3 lookup performed trying to find the outbound interface), or dropped.

OUTBOUND ACLs 
If you apply the ACL as 'out' the incoming interface does NOT compare the packet content with the ACL statements. It performs a layer 3 lookup immediately. Once the outbound interface is found, and the ACL is applied there as 'out' it analyzes the ACL statement one by one (top-down). Once the match is found (permit or deny) the packet is or is not sent out that interface.

Remember, that IP standard ACLs check the source IP only!


In the next post, I show you a few examples of IP standard ACL with a detailed analysis how they work. This and the next post should get you going with IP standard ACLs.

Mar 11, 2013

Lesson 15 - VLANs Overview


Now, this is the topic I give more importance to. Not because it is harder or confusing- absolutely not, but just because it is easy and very important therefore I cannot allow myself nor you Dear readers, nor anybody else should miss this part of the "networking twist", while learning cisco fundamentals.


At this stage you should be familiar with the concepts related to TCP/IP traffic flow and switch operation. You should also feel confident about how to diagnose basic layer 2 connectivity issues. For the details please review my previous posts. In this one, I am going to extend your understanding of layer 2 technologies by introducing Virtual LANs (VLANs).


Before I introduce our main topic let's define the problem which VLANS address first. This way, it's going to be easier to understand them.

Problem With Switching
As you remember from previous lessons, each port of a switch creates its own collision domain (for details look at lesson 9 in this tutorial). In addition to that a switch can use FULL DUPLEX connectivity when connecting other devices to its ports (computers, printers, switches, routers). That allows the ports to SEND and RECEIVE streams of bits at the SAME time. This is due to the special design of a switch. Thus, the efficiency of transmission is radically increased when compared to its older cousin a hub using half-duplex connections (sending or receiving but not both at the same time).

However, switches still maintain ONE BROADCAST DOMAIN. This means that in some situations they flood frames out of all active interfaces except the one that receives the frame. The flooding occurs if either of these are true:

  1. The destination MAC address of the arriving frame is unknown.
  2. The destination MAC address of the arriving frame is broadcast.
  3. The destination MAC address of the arriving frame is multicast.
  4. A switch reaches its limit of MAC addresses learned on a port. Then all other MAC addresses can no longer be learned.
Pic. 1 - Switches maintain one broadcast domain (bottom left computer sends broadcast).
Icons designed by: Andrzej Szoblik - http://www.newo.pl

In a flat network like the one depicted above (Pic. 1), imagine a thousand computers sending broadcast traffic (e.g. ARP requests). They will be propagated everywhere as per rules described earlier. Imagine another situation in which a broken NIC (Network Interface Card =  Network Adapter) sends thousands of broadcast frames per second. Those will be flooded to all hosts interrupting them as they need to process broadcast frames. In those situations not only do we interrupt all hosts by sending frames to them, but also saturate links with garbage data unnecessarily. Why would my computer have to listen to broadcast traffic sent by HR server if I work in IT department? I do not use HR server's resources at all. Exactly!

VLANs Are Broadcast Domains
Virtual LANs are the method of creating multiple broadcast domains of smaller size in a switching infrastructure. They are commonly used solution to the above mentioned problems. By configuring VLANs on the switches you create multiple broadcast domains which are treated as separate, isolated LANs which CANNOT communicate with one another by default. This allows us to contain the broadcast/multicast/unicast traffic WITHIN a boundary of a given VLAN. 

Pic. 2 - VLANs Are Broadcast Domains
Icons designed by: Andrzej Szoblik - http://www.newo.pl

If you consider traffic in the Pic. 2, the computers in red transmit their bits onto the wire, switches will send those only to computers that are in the same VLAN, that is red in this case. For instance, if the bottom right red computer sends layer 2 broadcast (destination MAC address = FFFF.FFFF.FFFF), only computers in red VLAN are going to receive this transmission. Computers located in turquoise VLAN will NOT receive those frames anymore. This way we can segment the traffic between different hosts based on criteria such as groups of interests (workgroups), type of traffic (e.g. VoIP), type of the application used, user location, etc. So, the major benefits of using VLANs are: 
  1. Broadcast/multicast traffic propagation is limited to a given VLAN (broadcast domain) where it originated.
  2. Security is increased, as hosts located in different VLANs CANNOT communicate at all. The only way for them to communicate is to allocate different network/subnet addresses for VLANs and use a layer 3 device (router) to move the packets between them. The routers offer some control as to who can transmit to whom (ACLs, firewalls etc.). How to accomplish routing between VLANs I will explain in my next post.
I hope the above description sheds enough light on what VLANs are used for. Now, is the time to look at some details regarding their configuration.

VLAN Port Types
In order to segment the traffic, the hosts generating it must be assigned to the appropriate VLAN since all ports of the switch are members of VLAN 1 by default. The process of configuring that usually involves three major steps:
  1. Configuring VLAN number in the switch database (optionally name of the VLAN and/or other parameters).
  2. Assigning hosts to VLANs defined in step 1. There are two ways of doing that: either MAC address can be assigned to a VLAN (dynamic method), or port of the switch can be assigned to a VLAN (manual method).
  3. Configuring VLAN Trunk connections between the switches. Even though, this step is optional, the majority of designs out there will need it.
The above mentioned configuration steps define two different port types VLANs can use:
  1. Access Port - this type of port can be member of ONE VLAN ONLY. If a static port-to-vlan configuration is used, the port interprets all incoming frames as belonging to this specific VLAN. In case of using mac-address-to-vlan configuration the port will determine VLAN number (ID) for transmission based on the MAC address which is mapped to a specific VLAN.
  2. Trunk Port - which by default belongs to ALL VLANS (1-4094). In other words, this port is capable of sending and receiving a traffic coming from different VLANs.
When is the trunk (multi VLAN) port required?

The below picture (Pic. 3) illustrates the need for it.

Pic. 3 - VLAN Port Types
Icons designed by: Andrzej Szoblik - http://www.newo.pl

The grey rectangles symbolize two switches. The colors, represents different ports assigned to different VLANs. Of course, VLANs in practice use numbers, not colors, to distinguish between themselves. When any bottom computer sends broadcast (or unicast towards another computer in the same VLAN/color connected to the upper switch), the port connecting the two switches must be trunk (multi-vlan port). In such situation w must allow all VLAN members to communicate with their peers in the same VLAN, irrespective where they are located. Both switches have yellow, red and blue members here! And according to the rules, red computers must be able to talk to all red computers located on the same and all other switches as well (yellow-to-yellow, and blue-to-blue).They are members of the same Virtual LAN after all.

In such design, in which members of the same logical network (VLAN) or broadcast domain are connected to different physical switches, the connection between them must be a trunk. Trunk ports run a special protocol called IEEE 802.1q (Cisco have also their own protocol called ISL, details of which are beyond the scope of this tutorial). This protocol is responsible for 'tagging' the frames (injecting extra information into their headers), while sending them out the trunk port.

Why?

Let me explain. Look carefully at the Pic. 3 and imagine that the computer connected  to yellow VLAN is sending broadcast towards all computers that are in the same, yellow, VLAN. The port between the switches is trunk, and as such allows ALL VLANs in and out. But the problem is that the receiving port on the upper switch gets the Ethernet frame on the port working as trunk as well. So, this port is also a MULTI-VLAN port! How does this upper, receiving, switch know which VLAN the frame is coming from? Well, it does NOT know whether the VLAN sending this broadcast was yellow, red or blue. This is where the sending (bottom) switch, using the trunk as outbound port, is going to inject extra 4 bytes into the Ethernet frame while transmitting it out. The tag will contain VLAN ID (number) of the sender. This way, the broadcast frame will have an extra information allowing the receiving switch (upper one) to recognize which VLAN it is coming from and forward this broadcast to ALL computers in the same VLAN (here yellow VLAN).


NOTICE!
The TAG  is stripped off on the outbound ports configured as ACCESS ones. The tag is useful only on trunk ports.


Before we finish this VLAN overview lesson, let me show you what information this TAG contains.

Pic. 4 - 802.1q TAG

The 802.1q tag is injected between the source MAC address and the type field in the Ethernet II header (pic. 4). It consist of two fields taking two bytes each:
  1. First two byte field contains a signature of 802.1q protocol using value of 0x8100.
  2. Second two byte field  contains:
  • PRI - Class of Service 3 bits used by QoS, 
  • Canonical bit for token ring support, 
  • VLAN ID value that takes up 12 the least significant bits in the tag.
    802.1q Native VLAN
    There is one more thing I need to touch upon that is related to the 802.1q trunk port. That is the concept of Native Vlan. The designers of the protocol decided to send frames coming from so called 'native VLAN' out the trunk as UNTAGGED. In other words this frame does not have any tag inserted into the Ethernet header. So, frame coming from 'native VLAN' is a regular Ethernet frame. As long as the switches agree on the trunk link which VLAN is their 'native VLAN' for this trunk, a frame arriving on the trunk port without the tag is assumed to be coming from the same native VLAN the sender was transmitting. The default  'native VLAN' is VLAN 1, since this one cannot be removed from the switch. Probably the reason VLAN 1 is the 'native VLAN' by default is becuase switches originate frames such CDP, VTP, STP from this VLAN and there is no need to tag them as they are switch-to-switch communication only.


    NOTICE!
    As of the time of writing this tutorial, all ports of Cisco switches belong to VLAN 1 by default which is also the (untagged) 'native vlan'. That VLAN is not going to tag frames on trunk-to-trunk connections.


    I am sure you realize what can happen if the two ports connecting switches use different VLAN ID for their 'native VLAN'. Yes, that can cause leaking frames between VLANs. And this is a serious security issue. So keep the same 'native VLAN' on trunk paired ports between switches.

    In my next post we will look at the same concepts from the command line perspective. I will also introduce VTP protocol as well as Inter-VLAN routing.