Showing posts with label source. Show all posts

Mar 13, 2013

Lesson 53 - Network Address Translation Part 3


In my last post I tried to explain the main principles behind NAT. As an example I used static and dynamic approach in which a client receives multiple IP addresses from the ISP (Internet Service Provider). In most cases though, we receive only a single IP address which is used on the router's interface that faces the Internet.

In that case, how a single IP address can represent (be used by) multiple computers in order to allow them communication with the hosst on the Internet? The solution is to use NAT Overload.

NAT Overload
In this method, the major points described in previous lesson do not change. Still, the router will have configuration that allows is to distinguish the 'nat inside' and 'nat outside' interfaces.

Also, the router is going to replace an 'inside local' IP address with the 'inside global' (the one used on the interface connected to ISP). This time though, ALL inside local addresses (private ones; RFC 1918) will be represented by the same unique public IP address (e.g. 86.46.1.10). This will instigate the problem when the packets are sent back from the Internet. They all point to the SAME public IP. That is why, we need something else to distinguish between PC1 (e.g. 192.168.1.1) and PC2 (e.g. 192.168.1.2) that will be represented by the same address: 86.46.1.10.

What could be this distinguisher?

TCP/UDP ports of course! Recall, that each computer, while sending something out, picks a source port from the range above 1023, and the well-known destination port. These are enough to distinguish PC1 from PC2, since it is very unlikely they will pick the same source port. If that happens, the router will replace this source port in TCP or UDP header with something unique.

Here's what happens when PC1 sends packets towards www.ciscco.com.


Step 1
The packet from PC1 (src: 192.168.1.1) arrives at the 'nat inside' interface (f0/0). The router is instructed to read its source IP address as well as its source TCP port in the layer 4 header. Appropriate entry is created in the NAT table as per Pic. 1 (Inside Local). Note, that this time R1 makes a note of the source port: 192.168.1.1:2001
The IP source address is removed and replaced with the 86.46.1.10 (R1's 'nat outside' interface - S1/0). The entry in the NAT table is created under the 'Inside Global' column. Also, the 'Outside Local' and 'Outside Global' entries are populated as per Pic. 1. This record in the NAT database, will allow to translate the packet back when www.cisco.com is replying to the sender (PC1).

Notice!

The :2001 is the port number in the TCP header.

Pic. 1 - NAT Overload - PC1's Transmission.
Icons designed by: Andrzej Szoblik - http://www.newo.pl

Step 2
When www.cisco.com (72.163.4.161) replies, the packet is delivered back to R1. The router, upon receiving the packet on the 'nat outside' interface, must now find the appropriate record in the NAT table, allowing it to locate the original sender's IP address and its source port (here: 192.168.1.1:2001). If there is no such entry, the packet is going to be dropped. Since in our case, the entry exists, the router is translating the packet back as shown in the pic. 2:

Pic. 2 - NAT Overload - PC1 Receives the Reply from www.cisco.com.
Icons designed by: Andrzej Szoblik - http://www.newo.pl

Suppose during this transmission, (PC1-to-www.cisco.com), PC2 is also going to send something towards the Internet. In order to simplify our discussion, PC2 is going to send the packet towards www.cisco.com as well (but this could be any host on the Internet).

Step 3
R1 receives another packet on its 'nat inside' interface (f0/0). It is sourced by IP address 192.168.1.2, the source TCP port 1408 this time. This port has not been used yet (does not exist in NAT table under 'inside local' column), so it is unique and can be used to send the packet out. Another entry is going to be created as per pic 3 below. Watch carefully the second record in the NAT table.

Pic. 3 - NAT Overload - PC1's Transmission.
Icons designed by: Andrzej Szoblik - http://www.newo.pl

Step 4
The web server (www.cisco.com) is sending the reply back. Again, R1 will look for the appropriate entry in the NAT table ('inside global=86.46.1.10:1408), to find out which machine was the originator of the traffic flow. Translation back to the original values is performed (dst: 192.168.1.2:1408). PC2 receives the reply from the web server.

Pic. 2 - NAT Overload - PC2 Receives the Reply from www.cisco.com.
Icons designed by: Andrzej Szoblik - http://www.newo.pl

In case the source port has already been used by some computer (even though it is rare it can happen), the router is going to use a different port. Imagine that the PC2 has also chosen to use the port 2001. In such situation, the 'Inside Local' entry is going to look like this:
192.168.1.2:2001

But, then upon noticing the port is already in use, the router will pick some other port that has not been used yet. The corresponding entry in the 'Inside Global' will be be changed to this for instance:
86.46.1.10:2002

In such case, the cisco web server will be replying to two different destinations:
86.46.1.10:2001 translated back to: 192.168.1.1:2001
and
86.46.1.10:2002 translated back to:192.168.1.2:2001

I hope this will do for you. In my next post, I'm going to show you how to configure NAT using four different methods:

  • Static NAT (one-to-one)
  • Dynamic NAT using pool of addresses
  • Dynamic NAT overload
  • Dynamic NAT using pool of addresses with overload

Lesson 49 - Packet Filtering with Extended ACLs


This post I start with presenting solution to the Task 2 I left unanswered in the lesson 49.

Task 2
Configure an IP standard ACL that denies packets coming from the host 172.31.123.3 going towards 192.168.5.0/24. Traffic from other sources should be allowed. 

Again, we use the standard IP ACL here, which is going to be applied on R5. Here goes:

R5 Configuration:

!
! In the global config 
!
access-list 1 deny host 172.31.123.3
access-list 1 permit any
!
! Enter the the incoming interface and apply the access-list
!
interface serial0/2
 ip access-group 1 in
!

Notice!

  • access-list 1 - ACL numbers 1-99 are IP standard ACLs (check source of the packets only.
  • host 172.31.123.3 - this keyword is an alias for: 172.16.123.3 0.0.0.0. It is a source address of the packets being inspected.
  • any - this keyword is an alias for: 0.0.0.0 255.255.255.255 - any source here.
I hope your answers were correct. Now is the time to learn Extended ACLs.

First, look at the syntax you see in Cisco documentation:

Pic. 1 - Extended ACL Syntax.

If you go like: 'OMG!' do not worry because you do not have to use all these keywords.

The options we are going to use can be presented as follows:

Pic. 2 - Extended ACL Common Syntax.
It looks a bit more convoluted but do not worry because in time you will feel quite confident with it. Your best friend is help '?' which is going to show you what options and arguments are required.

The best way to explain the syntax you need to get familiar with is to use an example and try to de-construct it. So, let's look at our topology one more time and create the following filter:

Task 1
Deny telnet sessions coming from 192.168.4.0/24 destined to 172.31.3.0/28 and 172.31.3.16/28. All other traffic should be allowed.

Pic. 3 - Topology.
Icons designed by: Andrzej Szoblik - http://www.newo.pl

Which ACL type should we use?
Since, we are very specific in terms of which protocols we want to deny, we must use Extended ACL. The standard ACL can only match on the source IP address, permitting or denying all protocols the packet is carrying.

Which router/interface should we apply the ACL on?
Our topology clearly shows that R3 has three different interfaces with three different addresses. So, we have two options here:

  • We can configure an Extended ACL on R4 FastEthernet 1/0 interface in the inbound direction (close to the source as per ACL guideline)
  • We can configure an Extended ACL on R4 Serial0/2 in the outbound direction.
  • Alternatively, we can apply an Extended ACL on R3 FastEthernet1/0 (inbound).
I'm going to chose the option suggested by the ACL guide lines: as close to the source as possible.

Let's read the task again:


Task 1

Deny telnet sessions coming from 192.168.4.0/24 destined to 172.31.3.0/28 and 172.31.3.16/28. All other traffic should be allowed.

Here's one way to configure this:

R4 Configuration:

!
! In the global 'config' mode the statements are:
!
access-list 100 deny tcp 192.168.4.0 0.0.0.255 172.31.3.0 0.0.0.15 eq 23
access-list 100 deny tcp 192.168.4.0 0.0.0.255 172.31.3.16 0.0.0.15 eq 23
access-list 100 permit ip any any
!
! Apply the ACL on the interface
!
interface FastEthernet 1/0
  ip access-group 100 in
!

Three lines that 'deny' traffic are similar. Let's dissect its syntax:

access-list 100 deny tcp 192.168.4.0 0.0.0.255 172.31.3.0 0.0.0.15 eq 23

  • access-list 100 - The extended ACL (numbers 100-199)
  • deny - condition (either 'deny' or 'permit' are allowed)
  • tcp - layer 3 or 4 protocol (such as: ip, icmp, tcp, udp, rip, eigrp etc.)
  • 192.168.4.0 - source IP address
  • 0.0.0.255 - source wildcard mask (inversed mask)
  • 172.31.3.0 - destination IP address
  • 0.0.0.15 - destination wildcard mask (inversed mask)
  • eq - operator: eq (equal), lt (less than), gt (greater than), range
  • 23 - destination port (telnet)
Notice!
After source wildcard there is no source port. This means that the source port is not inspected at all (disregarded).

In the next post I'm going to show you few examples of extended ACL which should reinforce your study

Mar 12, 2013

Lesson 33 - Static Routing


In the previous post I attempted to explain how a router selects the best route if there are multiple paths available. In this lesson, I'm going to show you how you can use static routes effectively in two different topologies (the second one uses backup links). You'll see how basic knowledge on route selection can come in handy if you plan on using primary and backup connections.

All Cisco routers have the routing capability turned ON by default. The command responsible for this is:

router(config)#ip routing

This allows a router to create and use the routing table the moment we enable and configure at least two interfaces.


NOTICE!
Some subnets and networks are simulated by means of creating and configuring virtual interfaces (Loopback) in my topology.


Pic. 1 - Routing Topology 1

Icons designed by: Andrzej Szoblik - http://www.newo.pl

Directly Connected Networks
In the topology used (pic. 1), the routers have been assigned IP addresses and the interfaces are up. Since the routing process is enabled (ip routing) the directly connected subnets/networks show in the routing table immediately. Look at R1's routing table:

Pic. 2 - Directly Connected Networks.

The problem is with the destinations that are NOT connected directly to a router (remote). A router does not know anything about these by default. There are two ways of "teaching" a router about remote networks or subnets:
  1. Applying static routing (manual method)
  2. Applying dynamic routing (a routing protocol that distributes information automatically)
Static Routing
There are pros and cons of using manual method. In complex scenarios (with redundant connections), more often than not, we use dynamic routing protocols. But there are situations in which static routing is good or perhaps the best solution.

Consider our example. R4 and R5 are connected to so called stub networks. A stub network hasonly one way in and out (one path). Some routers used in such designs are relatively cheap and may not even have enough hardware resources to run a dynamic routing protocol (such as OSPF or EIGRP). Then, installing static routes is the only option possible. Also, imagine your broadband router (your home network is also the stub-like if you're connected to one ISP). This router does not have the paths to each and every destination on the Internet. It uses a form of static route instead known as: default route. More on the default route later in the post.

Let's look at the syntax which allows us to instruct a router about remote networks and subnets manually.
Pic. 3 - Static Route Command Version 1.
Let's read what this command does. 
"IP route towards class C network 192.168.1.0/24 can be reached by sending packets to a next-hop router out the serial0/2 interface."

The last parameter used shows the router which interface should be used to send the packets out. If you configure the outbound interface instead of the IP address of the next-hop router in the path, this connection must be point-to-point (not multiaccess).

In case, the router's egress (outbound) interface is multiaccess link (Ethernet, Frame-Relay, ATM etc.), we must NEVER use local interface but IP address of the next-hop router instead. If you do not follow this recommendation, the router will try to resolve the layer 3 to layer 2 address for every destination out that interface. This leads to serious inefficiency and shows little understanding of routing operation of a person who used it.

If the router must send the packet to the next router in order to get to the destination (egress interface is multiaccess), the 'ip route' command should look like the example below (pic. 4).

Pic. 4 - Static Route Command Version 2.
Let's configure our routers so they can reach all networks int the topology used (pic. 1).

NOTICE!
The routing works in both directions. This means that the router receiving packet to its directly connected network/subnet must know the returning path to the sender of the packet (source).


Configuration on R1

Step 1
Reachability towards 172.31.2.0/24. The next-hop router is R2. The outbound interface is multiaccess link (F1/0). The order of statements does not matter. Configuring the remaining routers I will use a more logical approach than on R1.

R1#configure terminal
R1(config)#ip route 172.31.2.0 255.255.255.0 172.31.123.2
R1(config)#

Step 2
Reachability towards 172.31.3.0/28 and 172.31.16.0/28. The same egress interface (F1/0).

R1(config)#ip route 172.31.3.0 255.255.255.240 172.31.123.3
R1(config)#ip route 172.31.3.16 255.255.255.240 172.31.123.3
R1(config)#

Step 3
Reachability towards 192.168.4.0/24. The egress interface is point-to-point (S0/2 running HDLC protocol). I can use either the next-hop IP address or the local interface s0/2.

R1(config)#ip route 192.168.4.0 255.255.255.0 s0/2
R1(config)#

Step 4
In order to reach Branch2 network 192.168.5.0/24, R1 must use R2 as the gateway. Even though R2does not know how to get there now, I will configure it and then configure R2 to reach all networks and subnets (including 192.168.5.0/24).

R1(config)#ip route 192.168.5.0 255.255.255.0 172.31.123.2
R1(config)#

Step 5
Reachability to the point-to-point subnet between R2 and R5 (172.31.25.0/24).

R1(config)#ip route 172.31.25.0 255.255.255.0 172.31.123.2
R1(config)#


Now, let's see what the routing table reveals:

Pic. 5 - Routing Table of R1.
 

Before I proceed with the configuration of the other routers let's consider a few things.

Look at the R1's routing table and the topology carefully, and try to answer the following questions before you test the reachability using 'ping'. If you have problems answering the questions 1, the remaining ones (2-4) should give you a few hints.

Question 1
How many IP addresses presented in the topology (pic. 1) will respond to ping from R1 after you have configured static routes so far (only R1 is configured with static routes; all other routers have IP addresses and interfaces enabled)?

Question 2
R1 sends ping (echo request) towards 192.168.4.1. What is going to be the source IP address of this request?

Question 3
R1 sends ping (echo request) towards 172.31.25.2. Is R1 going to receive reply (echo reply)? Why?

Question 4
R1 sends ping (echo request) towards 172.31.25.5. Is R1 going to receive reply (echo reply)? Why?

If you have answered them, check if you were right. The answers are as follows.

Answer 1
There are 11 IP addresses to respond to the ping sent by R1. These are:

  • 172.31.1.1 - reason: directly connected subnet (Loopback 1).
  • 172.31.123.1 through 3 - reason: directly connected subnet (F1/0).
  • 172.31.3.1 and 172.31.3.17 - reason: source IP address is the 172.31.123.1. It's the egress interface to reach these two addresses (via F1/0). R3 knows how to get back toR1's F1/0 interface (R3's F1/0 is connected to 172.31.123.0/24 too).
  • 172.31.2.1 and 172.31.25.2 - reason: R1 will use F1/0 (egress interface) to reach these IP addresses according to our 'ip route' statements. The source IP address is going to be the address of F1/0. R2 knows its way back to 172.31.123.0/24 subnet (directly connected to F1/0).
  • 172.31.14.1, 172.31.14.4 and 192.168.4.1 - reason: R4 knows how to get back to the source IP address R1 uses for these destination. R1 uses 172.31.14.1 as the source IP address. This source (subnet 172.31.14.0/24) is shared between R1 and R4 on their Serial0/2 interfaces.
The reason I ask this question is to draw your attention to two important facts:
  • A router is going to find the best match in the routing table for each destination. If not found, of course the packet is dropped. If found though, a router will not change the source and destination addresses in packets TRAVERSING it. If the packet isORIGINATED by the router (here: ping), the source of IP address used is going to be the address of its egress (outbound) interface by default.
  • Sending a packet out is one job, but the destination will try to send a response back to the source. The remote router which is going to respond, must know how to reach the source of the transmission as well (valid path back to the source in its routing table).
Answer 2
Ping from R1 towards 192.168.4.1 is going to use 172.31.14.1 as its source address since according to the routing table Serial0/2 is the outbound interface.

Destination 192.168.4.1 shows the following detailed output on R1:

Pic. 6 - R1's Route Towards 192.168.4.1.

The route shows that the longest match for 192.168.4.1 is: 192.168.4.0/24. This routing table entry points to Serial0/2 as an egress interface.

Answer 3
R1 sends the ping (echo request) packet towards 172.31.25.2. Like explained in the answer 2, the source IP address for this echo request is going to be the address of the outbound interface (FastEthernet1/0). R2 knows how to reply back to 172.31.123.1 since R2 is directly connected to the subnet 172.31.123.0/24 with its FastEthernet1/0 interface.

Answer 4
R1 sends the ping (echo request) packet towards 172.31.25.5. It is NOT going to get the reply fromR5. The reason is that R5 does not know how to reply back to the source (172.31.123.1). It has not been configured to reach remote subnets and networks yet.

I hope you have found this little quiz entertaining and informative enough.

Would you know how to configure R2 and R3 using R1's configuration as an example? Give it a try. If you can't do it yet, just follow the configuration presented below.

Configuration on R2

Step 1
Reachability to networks/subnets via R1.

R2#configure terminal
R2(config)#ip route 172.31.1.0 255.255.255.0 172.31.123.1
R2(config)#ip route 172.31.14.0 255.255.255.0 172.31.123.1
R2(config)#ip route 192.168.4.0 255.255.255.0 172.31.123.1
R2(config)#

Step 2
Reachability to networks/subnets via R3.

R2(config)#ip route 172.31.3.0 255.255.255.240 172.31.123.3
R2(config)#ip route 172.31.3.16 255.255.255.240 172.31.123.3
R2(config)#

Step 3
Reachability to network via R5.

R2(config)#ip route 192.168.5.0 255.255.255.0 s0/2
R2(config)#

Configuration on R3

Step 1
Reachability to networks/subnets via R1.

R3#configure terminal
R3(config)#ip route 172.31.1.0 255.255.255.0 172.31.123.1
R3(config)#ip route 172.31.14.0 255.255.255.0 172.31.123.1
R3(config)#ip route 192.168.4.0 255.255.255.0 172.31.123.1

Step 2
Reachability to networks/subnets via R2.

R3(config)#ip route 172.31.2.0 255.255.255.0 172.31.123.2
R3(config)#ip route 172.31.25.0 255.255.255.0 172.31.123.2
R3(config)#ip route 192.168.5.0 255.255.255.0 172.31.123.2
R3(config)#


As for the routers R4 and R5 they connect stub networks. In order to simplify the configuration on these and reduce the number of entries on them, I am going to use a special type of static route called: the default route.

Pic. 7 - Default Route Example.

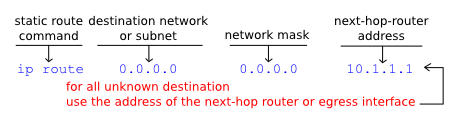
The destination IP address 0.0.0.0 (unknown) represents all destination which cannot be found in the routing table. This address uses the network mask of all zeros (0.0.0.0). As long as the router does not have the best match in the routing table for a given destination ('subnet not in table') the default route is going to be used instead. It is the 'gateway of last resort'. Like previously explained, on point-to-point links you can use the outbound interface instead of the address of the next-hop router.

Applying default routes is going to be easy.

Configuration on R4
Step 1
Packets for all unknown destinations send via R1.

R4(config)#ip route 0.0.0.0 0.0.0.0 s0/2
R4(config)#

Configuration on R5
Step 1
Packets for all unknown destinations send via R2.

R5(config)#ip route 0.0.0.0 0.0.0.0 s0/2
R5(config)#

Simple test will prove the default route operation:

Pic. 8 - Default Route Test.

Even though the routing table does not have the route towards 192.168.5.1, the packets are delivered using the default route (via R1 which knows how to get there).

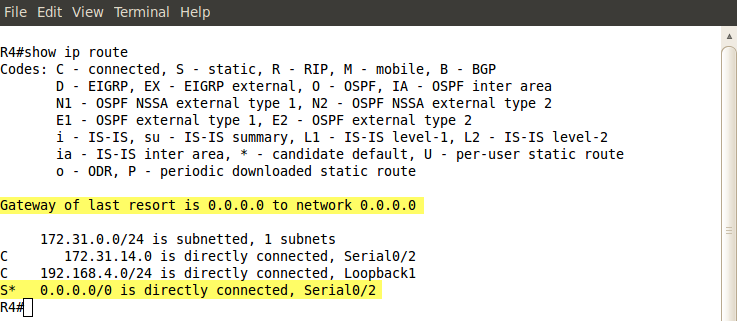
Look what the routing table shows when default route has been added (pic. 9).

Pic. 9 - Routing Table with Default Route.


Static Routing with Primary and Backup Links
In order to spice things up, I am going to configure two additional connections from HQ to our branches using Frame-Relay. These redundant paths must be used as the backup links. They should be used in the case of losing main path via Serial0/2 interfaces (down).

Pic. 10 - Routing Topology with Redundant Paths.

Icons designed by: Andrzej Szoblik - http://www.newo.pl

Please, disregard my configuration of Frame-Relay links for now. I'm going to address WAN protocols in the upcoming posts. I only need the extra connectivity to show you how to handle the primary and backup scenario using static routing.

Frame-Relay Configuration is going to look like this in order to reflect the topology in the pic. 10.

Circuit Between R1 and R5

R1 Configuration:

R1(config)#interface serial0/0
R1(config-if)#encapsulation frame-relay
R1(config-if)#no frame-relay inverse-arp
R1(config-if)#ip address 172.31.15.1 255.255.255.0
R1(config-if)#frame-relay map ip 172.31.15.5 105 broadcast
R1(config-if)#no shutdown
R1(config-if)#

R5 Configuration:

R5(config)#interface serial0/0
R5(config-if)#encapsulation frame-relay
R5(config-if)#no frame-relay inverse-arp
R5(config-if)#ip address 172.31.15.5 255.255.255.0
R5(config-if)#frame-relay map ip 172.31.15.1 501 broadcast
R5(config-if)#no shutdown
R5(config-if)#

Circuit Between R2 and R4

R2 Configuration:

R2(config)#interface serial0/0
R2(config-if)#encapsulation frame-relay
R2(config-if)#no frame-relay inverse-arp
R2(config-if)#ip address 172.31.24.2 255.255.255.0
R2(config-if)#frame-relay map ip 172.31.24.4 204 broadcast
R2(config-if)#no shutdown
R2(config-if)#

R4 Configuration:

R4(config)#interface serial0/0
R4(config-if)#encapsulation frame-relay
R4(config-if)#no frame-relay inverse-arp
R4(config-if)#ip address 172.31.24.4 255.255.255.0
R4(config-if)#frame-relay map ip 172.31.24.2 402 broadcast
R4(config-if)#no shutdown
R4(config-if)#

Now let's get back to the business. If I add two static route entries using the newly created paths, the metric of each of them is going to be identical with the metric used by the primary link (Serial0/2). This way, load balancing (traffic sharing) is going to be used since two equal cost paths exist. Our design stipulates that Frame-Relay circuits should be used as the backup links only (Serial0/2 down).

In order to accomplish this, I should change either the metric or administrative distance of the backup path. Unfortunately, we cannot change the metric (no command available) on static routes, but we can easily increase the value of administrative distance to make the backup path less preferred. The default AD for static routes is 1, so I will make the backup route less trusted by using the value of, say, 3.

Backup Link Between R1 and R5

R1 Configuration:

R1(config)#ip route 192.168.5.0 255.255.255.0 172.31.15.5 3
R1(config)#

R5 Configuration:

R5(config)#ip route 0.0.0.0 0.0.0.0 172.31.15.1 3
R5(config)#
  
Backup Link Between R2 and  R4

R2 Configuration:

R2(config)#ip route 192.168.4.0 255.255.255.0 172.31.24.4 3
R2(config)#

R4 Configuration:

R4(config)#ip route 0.0.0.0 0.0.0.0 172.31.24.2 3
R4(config)#

This way, the primary link (via Serial0/2) is preferred due to the lower administrative distance (AD=1). Look at R4 now:

Pic. 11 - R4's Routing Table with Primary Link UP.

In case the primary link goes down, the extra ip route (using Frame-Relay link) kicks in like shown in the pic. 12.
Pic. 12. - R4's Routing Table with Primary Link DOWN.


In the few upcoming posts, I will focus in on dynamic routing protocols.

Lesson 32 - Route Selection Process Demistified


It is imperative to know how a router selects the best path to some destination network/subnets if it has more than one to choose from. At least if you are serious about learning the routing principles. In this post I'm going to show you the algorithm a router uses to discriminate between multiple paths to the same destination.

A router can learn the routes to remote networks and subnets using manual instructions or by means of configuring routing protocols. This way routers learn how to reach destination networks/subnets dynamically. This post's primary focus is about Interior Gateway Protocols(IGPs) such as: RIP, OSPF, EIGRP. The only Exterior Gateway Protocol (EGP) we use nowadays is called BGP. It uses a bit more complex decision making process and is beyond the scope of this tutorial. In the future I am going to talk about it in more detail in the workbooks I plan to post in the future.

First things first. There are three terms I need to define in order to explain the process of selecting the best route. These are:

  1. The Longest Match Rule
  2. Administrative Distance
  3. Metric
The Longest Match Rule
In the previous post I showed you an example of routing table with a brief explanation about what each column in the output represented. Pic. 1 is the graphic equivalent of it.

When a router receives a packet, while processing the header, it is the DESTINATION IP address that is compared with the entries in the routing table in order to determine the next step. This next step is to find the egress (outbound) interface and the address of the next device to send the packet to. This form of routing is known as the destination-based routing. The process of comparing the destination IP with the prefixes int the routing table is done bit by bit (yes, routers see IP addresses in the binary notation). The entry that has the longest number of network bits that match the IP destination address is always the best match (best path). This is always the FIRST thing a router checks.

If there is ONLY ONE best match, a router has a simple task to do. It moves the packet to the outbound interface (egress) and encapsulates the packet in the layer 2 header according to the technology/protocol that is used on the outbound interface (Ethernet, PPP, HDCL, Frame-Relay etc.). Then, the frame is converted to bits and placed onto the wire/fiber optic cable.


NOTICE!
If the outbound interface is a multi-access interface (such as Ethernet, Frame-Relay, ATM etc.), the router must know the layer 2 identifier of the next-hop device (layer 3 to layer 2 address resolution). For instance, in case the outbound interface is Ethernet, the MAC address of the next-hop device must be in the router's arp cache (if not found, the arp query is sent). In case, the egress interface is of a point-to-point type (subinterface point-to-point or protocol such as PPP, HDLC etc. is used), there is NO layer 3 to layer 2 resolution being performed. The packet is simply encapsulated in layer 2 frame sent out that interface.


Let's consider the example depicted in pic. 1.

Pic. 1 - The Longest Match Rule.

In this example the router receives an IP packet. The DESTINATION Address in the packet is172.31.1.33. The router is going to compare this address (bit by bit), with the prefixes (address/network-mask) in the routing table presented, trying to find the closest match (the number of bits that are the same). The entry that is the best match will give the router instructions as to what is the address of the next-hop device (here another router) and the outbound interface.

Let's play the router's game and compare all the entries with the DESTINATION IP address of the packet.

There are three candidate entries pointing to three different next-hop routers and three different outbound interfaces (pic. 1). The pic. 2 shows these numbers in the binary notation.

Pic. 2 - Destination IP Address Comparison.

Clearly, when converted into binary, the first entry shows the best match . The number of identical bits between the packet's destination address and router's knowledge about the subnet is 28 identical bits (highlighted in red). The second entry has only 24 identical bits, and the third one, only 16 bits match the destination IP address (class B network address). That is why the egress interface for the packet towards 172.31.1.33 is FastEthernet0/0 (pic. 1).

So far, we have only dealt with the situation in which there is a SINGLE best match. What if there are more than one entries (paths available) in the routing table with the EXACT same longest match?

There are two other parameters a router uses to break the tie:

  1. Administrative Distance
  2. Metric
Administrative Distance
There are the situations that your router(s) may use more than one source of information. Not that you create such situation on purpose. You are better off using one protocol (e.g. OSPF), but reality bites and sometimes you have to support more than one routing protocol in the same routing domain. In such situations your router may receive the same prefix(es) from different sources. As a result of that multiple sources (RIP, OSPF, EIGRP etc.) provider the router with the EXACT same prefix (address/network-mask).

In order to deal with situations like this, Cisco have created a ranking which assign the protocols (sources of information) different levels of "trustworthiness" (if that's a word). This level of "believability" is expressed with the arbitrarily allocated value that is given to different sources of information. This parameter is called: Administrative Distance (or just 'distance'). The LOWER the value of AD is, the more trusted the source of information is going to be.

Consider the pic. 3. The router receives EXACT same prefix (192.168.1.0/24) from two different sources: RIP and OSPF. Since this is going to cause an issue as to which one is better, AD is going to break the tie. OSPF is more trusted than RIP as it has lower value of Administrative Distance assigned to it (110) compared to RIP's (120).

There are many reasons why RIP is less trusted source than OSPF, but explaining it in detail is beyond of the scope of this post. Needless to say, if you do not like Cisco arbitrarily set values, there are ways of changing them. The commands are different for different protocols, and when we get to advanced topics (hopefully), I'm going to show them to you.

Pic. 3 - Advertisement Come from Different Sources (Protocols).

Icons designed by: Andrzej Szoblik - http://www.newo.pl

I have included a few AD values for the most often used protocols to get you going. For more information on that go to Cisco web site. Of course the best way of finding the values is to use my favorite search engine: google ;).

Metric
Another situations that might put a router in a difficult position regarding which path is the best occurs when there are multiple longest match entries in the routing table, coming from the same source. Or more accurately speaking, there are multiple best matches (EXACT prefixes) having the same value of Administrative Distance (AD).

In such situations, the tie-breaker is going to be the LOWEST value of the METRIC.

A metric is the value calculated for each prefix and expresses, for the lack of better word, how far the destination is. The lower the value, the more preferred the path is.

Keep in mind, that the type of metric routing protocols use (the way they calculate it) is different between them and totally INCOMPATIBLE. They use different ways and factors to calculate their metric.

Just to give you a few examples, RIP uses the concept of hop-count. The number (metric) tells the router how many routers the packet must traverse before it reaches the destination.

OSPF on the other hand, uses the cost as its metric. It is calculated based on the bandwidth of the interfaces (links) in the path. This way, its metric is far more sophisticated and more suitable for our networks compared to RIP.

As you see it is not the coincidence that OSPF is more trusted source of information compared to RIP.

Consider the following example (pic. 4).

Pic. 4 - An Example of Metric Types.
Icons designed by: Andrzej Szoblik - http://www.newo.pl

If in your design you decided to use RIP in the above topology, the router A, would choose the best path towards 10.2.2.0/24 through router B. This is because the metric used by RIP takes into consideration the number of routers the packet has to traverse, and nothing else. The path throughrouter B is better (1 hop), as opposed to the path through routers C, D, B (3 hops). RIP does not factor in the bandwidth of the links in the path.

If you chose to use OSPF instead, the number of hops (routers the packet is going to go through) is irrelevant. OSPF makes forwarding decisions based on the bandwidth available in the paths. This way, OSPF prefers path through routers C, D, B, rather than through router B (much faster links available).

More on the topic of metrics in the upcoming posts. Now, that you have learned about the factors that help routers determine the best path, you are ready to take a look at the algorithm.

  1. Prefer the path with the longest match entry in the routing table (irrespective of the metric or AD).
  2. In case there are multiple best matches available, check the AD value (if they come from the same source). Choose the source of information with the lowest AD. 
  3. If the best match prefixes (more than one) come from the source with the same AD, choose the lowest metric number.
The same order of operation is presented in the pic. 5.


NOTICE!
When considering Border Gateway Protocol, its metric is very complex (not a single number like all Interior Gateway Protocols tend to use). As a result of that, the rules of finding the best route are also more complex and are beyond the scope of this post.


Pic. 5 - Route Selection Process.

Traffic Sharing
One last scenario. What if a router receives more than one exact longest match prefixes that have the same values of AD and the metric?

All of them are the best candidates and the router performs load sharing (load balancing) using all of the egress interfaces that are the best. Of course, whether it is per-packet, or per flow load-balancing depends on the switching engine configuration of your router.

I hope you have caught the idea by now. Check yourself by answering the following question. You will find the answers for all scenarios presented at the bottom of this post.

Practical Question
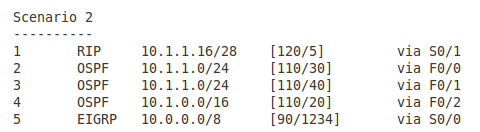
The IP packet has the destination address of 10.1.1.17. The third column on the left is the prefix learned. Which entry in the routing table (number in first column) is going to be the best in the following scenarios? Which outbound interface is going to be used?

Pic. 6 - Scenario 1.

 Pic. 7 - Scenario 2.


Pic. 8 - Scenario 3.
Pic. 9 - Scenario 4
Pic. 10 - Scenario 5

The answers to the question (all scenarios)
Scenario 1
Entry 2 is the correct answer. The egress interface is F0/0.
The router looks for the longest match in the routing table first. Entry 2 learned from RIP has the longest number of bits that are identical with the destination IP (it is the most specific). The remaining sources (OSPF and EIGRP) have fewer bits that match the destination address (they are less specific). The fact that they are more trusted does not apply here since the longest match is always preferred.

Scenario 2
Entry 1 is the correct answer. The egress interface is S0/1.
Just like in the scenario 1, the router looks for a longest match in the routing table first.
Entries 4 and 5 have 8 bits and 16 bits in common with the destination address respectively. Entries 2 and 3 have 24 bits in common. The longest match is the entry 1 having 28 networking bits that are identical with the IP address 10.1.1.17. You can check it by converting the last byte into the binary notation.

Scenario 3
Entry 2 is the correct answer. The egress interface is F0/0.
We can safely rule out the Entries 1 and 4 due to the length of network mask (not the best matches). We're left with Entries 2 and 3. Both have the same number of bits that are identical bits with the destination address (24). Both prefixes come from the same source (OSPF) and as a result of that have the same Administrative Distance value = 120. The tie breaker is going to be the metric value. Entry 2 has a cost of 30 and entry 4 has cost of 40. The lowest is the preferred one.

Scenario 4
Entry 2 is the correct answer. The egress interface is S0/0.
All five entries have the same length of prefix mask, so after longest match rule check we have five candidates.  However, entries 4 and 5 come from OSPF and have higher AD (120) than the first three entries coming from EIGRP routing protocol (90). The lower AD here is preferred. We can rule 4 and 5 out now. Again, all three of them left, have the same AD (90). The tie-breaker is the value of metric again.

Scenario 5
Entries 1 through 3 are the correct answer. The egress interfaces are S0/0, S0/1, and S0/2. The router is going to perform load balancing (traffic sharing).
We can rule out entries 4 and 5 like in the scenario 4. The remaining entries 1 through 3 come from EIGRP (AD=90) and their metrics are the same.

Mar 11, 2013

Lesson 17 - Inter VLAN Traffic Flow Analysis


In Lesson 16, you had a chance to see how to implement simple VLAN scenario. It is relatively easy to configure VLANs, but what is far more important, is to understand the traffic flow between them. This post is going to show you step-by-step, how traffic flows between VLAN 10 and VLAN 20 used in the previous lesson.

Fancy a little, virtual journey between VLANs?

Our topology looks like this:

Pic. 1 - Topology Diagram
Icons designed by: Andrzej Szoblik - http://www.newo.pl

In our scenario, PC1 (source) is going to send the packet to PC2 (destination). Let's jump on the packet and see what happens, shall we?

NOTICE!
MAC addresses use hexadecimal notation and are case insensitive (i.e. lower or upper case are interpreted as the same address).


PC1 (hostname=ancient) Addresses:
IP: 192.168.10.1/24
MAC: 0050.BF9C.456A
Gateway: 192.168.10.254

PC2 (hostname=red) Addresses:

IP: 192.168.20.1/24
MAC: 0010.5AD3.E4E0
Gateway: 192.168.20.254


NOTICE!
R1's interface FastEthernet0/0 has been configured as two sub-interfaces, but the MAC address used by both of them is the same (real MAC address of Fas0/0)


R1 Addresses: 

Gateway for VLAN 10 clients (sub-interface)
F0/0.10
IP: 192.168.10.254/24

Gateway for VLAN 10 clients
F0/0.20

IP: 192.168.20.254/24


F0/0 (both sub-interfaces use the real MAC below)
MAC:  000F.F752.EFE0

Having learned all these addresses we can finally hit the road!

Step 1
PC1 (ancient) wants to send a packet to PC2 (red). Since the IP address of the PC2 (destination) is NOT in the same layer 3 network as PC1 (source), it must be delivered to the default gateway.PC1 checks the destination IP by comparing its own 24 bits of the IP address (it uses 24 bit subnet mask=255.255.255.0) with 24 bits of the destination IP address.
192.168.10.0 (first 24 bits of PC1 in decimal notation)
192.168.20.0 (first 24 bits of PC2 in decimal notation)

The first sixteen bits (two bytes) are identical, but the third byte is NOT!

The packet must be sent to PC1's default gateway (192.168.10.254).

Step 2
Packet is encapsulated in a layer 2 Ethernet header. Source MAC address is PC1(ancient=0050.BF9C.456A) and the destination MAC address must be the default gateway's MAC address. PC1 (ancient) tries to find the mapping of the default gateway IP to its MAC address like shown below. If one is not found, the ARP request is sent asking for it. In my case the PC1 has it.

Pic. 2 - PC1 (ancient) ARP cache has mapping of R1's IP to its MAC address.
IP packet is encapsulated in the Ethernet header:
Src IP=192.168.10.1
Dst IP=192.168.20.1
Src MAC=0050.BF9C.456A
Dst MAC=000F.F752.EFE0

Those address are NOT going to change, until delivered to R1 router (look at step 7).

The frame leaves PC1 (ancient) and is sent towards SW1, interface F0/1.

Step 3
SW1 receives the frame on port F0/1. It learns or refreshes its MAC address table entry (PC1's source MAC address on F0/1). Remember, that F0/1 is now an 'access' port assigned to VLAN 10!This means, that all traffic coming to that port is considered as sourced by VLAN 10.

Pic. 3 - SW1 CAM entry for PC1.


SW1 must now find the outbound port for our destination MAC address (R1=000F.F752.EFE0).

Step 4
SW1 looks into its Content Addressable Memory (CAM) aka MAC address table, and finds the outbound port showing where the destination MAC has been previously learned.

Pic. 4 - SW1 outbound interface.

SW1 performs an additional check. It must make sure that the inbound interface (F0/1) and the outbound one (F0/15) belong to the SAME VLAN. As the F0/15 (outbound) interface is in a trunking mode, and allows ALL VLANs by default, the frame can be sent out that port. The frame is moved to the outbound interface (F0/15) and the TAG is going to be injected with the source VLAN identifier (VLAN 10).

Step 5
The SW3 (port F0/15) is receiving the frame with the TAG containing source VLAN 10. It refreshes the entry regarding the sender's MAC address (0050.BF9C.456A) on port F0/15. As this interface is also configured as a trunk, it accepts the frame with the 802.1q TAG inserted into the frame. It processes the frame trying to find the outbound interface by looking at the destination MAC address (000F.F752.EFE0). The entry is found in the CAM as shown below (pic. 5).

Pic. 5 - Default Gateway MAC address Entry on SW3.

The SW3 realizes that the outbound port is also a trunk interface. The frame is moved to F0/1 interface and the TAG (with source VLAN 10) is going to be preserved while sending this frame towards R1's F0/0 interface.

Step 6
Here's a tricky part. Normally, the R1 would expect to see just a regular Ethernet header (no TAG in it), but R1 has been configured to accept frames with the TAG containing VLAN 10 in it! Look at the picture below.

Pic. 6 - R1 accepts Ethernet header with the TAG containing VLAN 10 identifier.

Can you see this line: encapsulation dot1Q 10?

The TAG with VLAN 10 is allowed on this sub-interface. Now, since the layer 2 header is useless (remember that a router is a layer 3 device), it is stripped off and ditched. What is now being processed is the IP header. The R1, reads the destination IP address (192.168.20.1), and tries to find the outbound interface in the routing table by comparing source and destination IP addresses.

Step 7
Destination IP address (192.168.20.1) is compared with the entries in the routing table. The longest number that matches our destination points to F0/0.20 sub-interface (pic. 7). According to the routing table, the destination IP address (192.168.20.1) is directly connected to R1 (sub-interface F0/0.20).

Pic. 7 - R1 routing table.

The packet is moved from F0/0.10 sub-interface (inbound), to the F0/0.20 sub-interface (outbound).

Step 8
Since the interface is also configured with encapsulation dot1Q, the packet is going to be encapsulated with new source and destination MAC addresses and the TAG with the new source VLAN identifier (VLAN 20). Take a look at the picture below (pic. 8).

Pic. 8 - R1's outbound sub-interface configuration.


Step 9 
R1 encapsulates IP packet the Ethernet header as follows:
Src IP=192.168.10.1
Dst IP=192.168.20.1
Src MAC=000F.F752.EFE0
Dst MAC=0010.5AD3.E4E0 (PC2)
VLAN ID=20

Since the destination for the packet is directly connected to R1, the destination MAC address (that of PC2) is found in the ARP cache on R1. If one is not found, R1 sends ARP request asking for it as the destination is directly connected network.

Pic. 9 - ARP Cache on R1 shows MAC address for 192.168.20.1 (the last entry).

Step 10
The frame leaves sub-interface F0/0.20 with the TAG containing source VLAN 20 identifier as perR1's configuration (pic. 8).

Step 11
SW3 receives the frame on its F0/1 interface, but this time the MAC addresses look like below:
Src MAC: 000F.F752.EFE0 (R1's f0/0)
Dst MAC: 0010.5AD3.E4E0 (PC2)

SW3 refreshes the source MAC on its F0/0 interface. It is configured as trunk port, the TAG containing source VLAN 20 is allowed to be there.

Step 12
SW3 processes the frame and reads the destination MAC address (0010.5AD3.E4E0) trying to find the outbound interface for that destination.The entry is found pointing to F0/15 as the outbound interface (pic. 10)

Pic. 10 - SW3 entry for PC2 MAC address.


Step 13
The frame is delivered back to F0/15 of SW1. SW1 refreshes the source MAC address (000F.F752.EFE0) on its interface F0/15 and does the looks up in its CAM table trying to find the outbound interface for our destination MAC address (PC2). One is found as shown below.

Pic. 11 - SW1 finds the outbound interface for destination MAC (PC2)


Since both ports: inbound and outbound are trunks, the frame is sent out that port carrying VLAN 20. You can now guess what happens when the frame is delivered to SW2 port F0/13. Source MAC address is going to be refreshed on that port in the MAC address table (source here is the R1's MAC address). The inbound interface F0/13 on SW2 is configured as trunk port so it allows the TAG to be part of the Ethernet header. The SW2's outbound interface is going to be F0/1. Since this port is configured as an 'access' interface and is member of VLAN 20, both source and destination VLANs are the same. The frame is moved to the port F0/1, then the TAG is removed, as the outbound port is in 'access mode' and the frame is finally sent to PC2.

You may now be wondering why the path between the two VLANs looks like this. Why does SW3not send the frame directly to SW2 but it sends it back through SW1?

In order to answer that question, I must explain the details of Spanning-Tree Protocol. But this is the topic I will focus on in the upcoming lessons (starting with lesson 19).

Before we leave VLANs for good, I would like to dedicate one more lesson to it. In this lesson (lesson 18) I will try to help you check if you truly understand the implications of using VLANs, access and trunking interfaces. I'll also show you Cisco proprietary protocol called Vlan Trunking Protocol (VTP). This protocol is used to disseminate the VLANs among switches automatically.